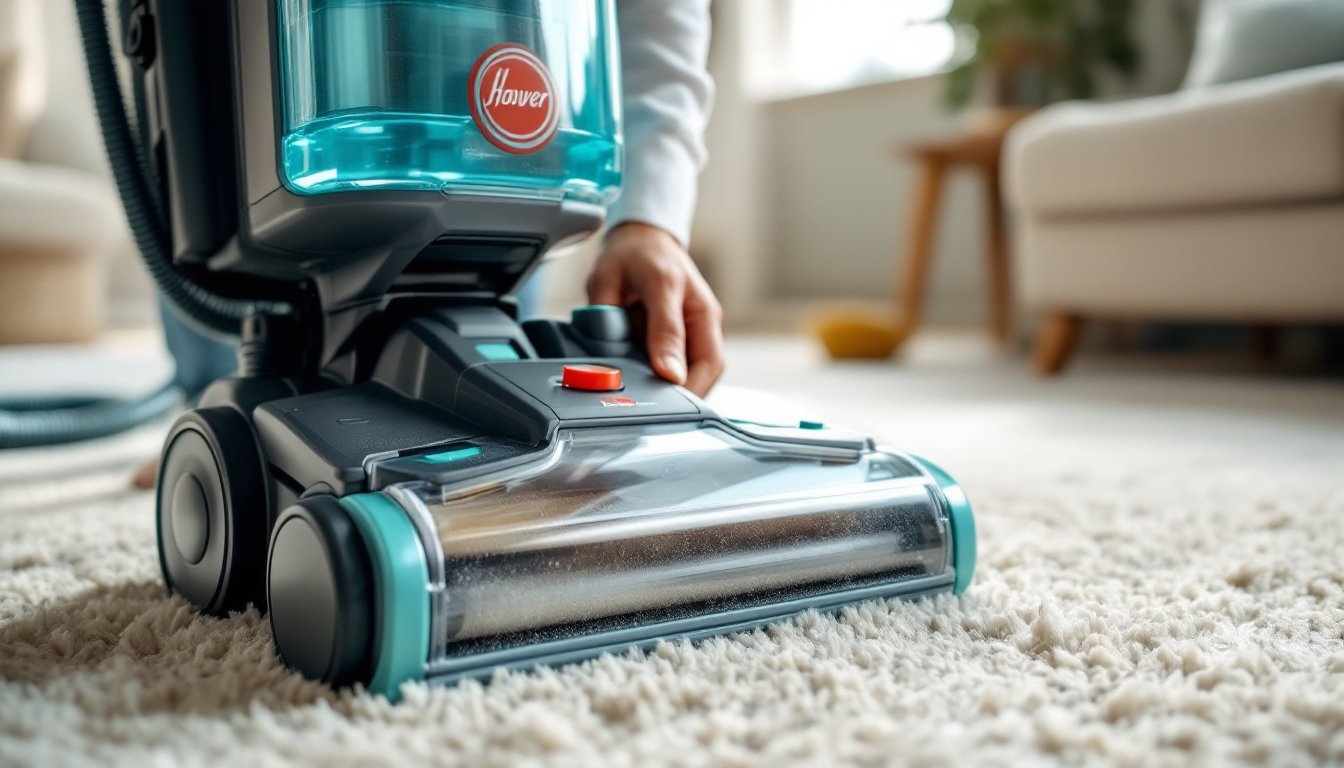
A Hoover carpet cleaner can transform grimy, traffic-worn carpets back to their original condition, but only if you use it correctly. Too many homeowners skip crucial prep steps, overfill tanks, or rush through cleaning passes, then wonder why their carpets stay damp for days or stains reappear within a week. This guide walks through every step of operating a Hoover carpet cleaner, from initial setup to post-cleaning maintenance, so you get professional-level results without hiring a crew. Whether you’re tackling high-traffic hallways or refreshing an entire living room, these instructions apply to most Hoover upright and portable models.
Table of Contents
ToggleKey Takeaways
- Master Hoover carpet cleaner instructions by pre-vacuuming thoroughly, using proper solution ratios, and operating with controlled forward-and-back passes to achieve professional results.
- Fill the clean water tank with hot tap water (120–140°F) and add the correct amount of cleaning solution to prevent sticky residue and ensure effective soil extraction.
- Apply solution on the forward pass while holding the trigger, then release on the backward pull for extract-only mode to avoid over-wetting and reduce drying time.
- Empty the dirty water tank immediately after use, rinse all removable parts including the brush roll and filter, and run a plain-water rinse cycle to prevent odors and buildup.
- For heavy stains or high-traffic areas, make two solution passes followed by two dry extraction passes, then improve airflow with fans to speed drying to 6–8 hours.
- Troubleshoot common issues like weak suction, no solution flow, or streaks by checking tank seals, inspecting hoses and filters for clogs, and adjusting solution ratios accordingly.
Preparing Your Hoover Carpet Cleaner for First Use
Unbox the machine and check for all included attachments: most Hoover models come with a stair tool, upholstery nozzle, and crevice tool. Inspect the clean water tank and dirty water tank for shipping clips or protective film, remove these before filling.
Before plugging in, examine the brush roll underneath the cleaning head. Remove any packing materials, twist ties, or plastic guards. Spin the brush roll by hand to ensure it rotates freely: a jammed brush won’t agitate carpet fibers, leaving dirt embedded.
Check the power cord for damage and locate the cord wrap hooks on the machine body, you’ll use these after every session. Identify the tank release latches (usually red or gray buttons) so you’re not fumbling mid-job.
Vacuum the carpet thoroughly with a standard upright before using the carpet cleaner. Carpet cleaners are designed to deep-clean fibers and extract embedded soil, not pick up surface debris like pet hair, crumbs, or grit. Running a carpet cleaner over loose dirt clogs filters and muddies the cleaning solution faster. For homes with heavy foot traffic or pets, an extra vacuum pass along baseboards and entryways prevents the cleaner from redistributing surface debris.
Step-by-Step Operating Instructions for Hoover Carpet Cleaners
Filling the Clean Water Tank and Adding Solution
Remove the clean water tank by pressing the release latch and lifting straight up. Most Hoover tanks hold between 1 and 1.5 gallons depending on the model (check the fill line molded into the plastic). Fill with hot tap water, not boiling, which can warp tank seals, but as hot as your tap delivers (typically 120–140°F). Hot water activates cleaning agents and loosens soil more effectively than cold.
Add the recommended amount of Hoover carpet cleaning solution according to the fill cap or tank markings. Using too much solution leaves sticky residue that attracts dirt: using too little reduces cleaning power. If you’re out of Hoover-brand formula, a mild alternative is 2 tablespoons of clear dish soap per gallon (avoid anything with bleach, lanolin, or degreasers not rated for carpets). Consumer test data from carpet cleaner reviews confirms that proper solution ratios prevent re-soiling and extend drying time.
Secure the tank back onto the machine base until it clicks. A loose tank won’t dispense solution properly and may leak onto your floor mid-cleaning.
Proper Cleaning Technique and Machine Operation
Plug the machine into a grounded outlet and switch it to the wash mode (usually marked with a water droplet icon). Press the machine handle down until it reclines to the working angle, most Hoover models won’t dispense solution unless the handle is tilted back.
Press and hold the solution trigger (a lever or button on the handle) while pushing the cleaner forward slowly, about one foot per second. Release the trigger on the backward pull. This technique applies solution on the forward pass and extracts dirty water on the return, preventing over-saturation. Each cleaning pass should overlap the previous one by about 3 inches to avoid streaks.
For heavy stains or high-traffic areas, make two forward-and-back passes with solution, then two extract-only passes (no trigger) to pull out as much moisture as possible. Over-wetting carpet can damage the backing, promote mold growth, and extend drying time beyond 24 hours.
Move furniture and work in sections roughly 4 feet by 4 feet. Start from the farthest corner and back your way toward the door so you’re not walking on freshly cleaned carpet. If the machine loses suction or cleaning performance drops mid-job, check the dirty water tank, most models stop extracting efficiently when the tank is more than three-quarters full.
Safety note: Wear rubber-soled shoes to avoid slipping on damp carpet, and keep children and pets off the area until it’s dry. If you’re cleaning stairs, work from the top down and use the stair tool attachment for better control.
Post-Cleaning Maintenance and Storage Tips
Empty the dirty water tank immediately after finishing. Rinse it in a utility sink or bathtub with hot water until the water runs clear, leftover sludge grows bacteria and smells sour by the next use. Remove and rinse the tank’s filter screen (a small plastic or foam insert) to prevent clogs.
Refill the clean water tank with plain hot tap water (no solution), reinstall it, and run the machine over a scrap towel or area you just cleaned. Trigger solution while pulling back slowly for about 10 seconds. This purges leftover cleaning formula from the internal hoses and spray jets, preventing residue buildup and musty odors.
Remove the nozzle and brush roll according to your model’s manual, most Hoover cleaners have a quick-release panel or screws on the bottom plate. Rinse the brush roll under running water to remove hair, fibers, and gunk. Let it air-dry completely before reinstalling: a damp brush roll stored in the machine creates mildew. Cleaning experts at home care sites recommend this step after every second or third use for optimal performance.
Wipe down the exterior housing and handle with a damp cloth. Check the wheels for hair wraps or debris that restrict movement. Store the machine in a dry, room-temperature location, avoid damp basements or unheated garages where plastic tanks can crack or mold can grow inside hoses.
Leave tank lids slightly ajar during storage to allow airflow. Coil the power cord loosely on the wrap hooks: tight kinks damage the internal wiring over time.
Troubleshooting Common Hoover Carpet Cleaner Issues
No solution dispensing: Verify the clean water tank is full and seated correctly. Check that you’re holding the trigger while the handle is reclined, many models have a safety lockout. If solution still won’t flow, remove the tank and inspect the valve on the bottom for debris or a stuck spring. Running plain water through the system (as described in maintenance) often clears minor blockages.
Weak or no suction: The dirty water tank is likely full or the float mechanism is tripped. Empty and rinse the tank, then confirm the tank lid gasket is seated flat, gaps break the vacuum seal. Check the nozzle and hose for clogs: a balled-up sock or clump of pet hair can cut suction by half. On models with a removable filter, a clogged filter is the usual suspect. Replace foam filters every 6–12 months depending on use frequency.
Machine leaves carpet too wet: You’re likely moving too slowly or holding the trigger on both forward and backward strokes. Release the trigger when pulling back to switch to extract-only mode. Make additional dry passes without solution. If drying takes longer than 6–8 hours, improve airflow with fans or open windows, stagnant air slows evaporation. High-pile or thick carpets naturally take longer to dry.
Streaks or rapid re-soiling: Over-application of cleaning solution leaves sticky residue that attracts dirt. Next time, use less solution or dilute further. Run extract-only passes with plain water to rinse out residue from the current cleaning. Homeowners seeking practical cleaning methods often find that less solution and more extraction passes produce better long-term results.
Brush roll not spinning: Shut off and unplug the machine. Flip it over and cut away hair or string wrapped around the brush roll ends with scissors (don’t yank, this can bend the roll shaft). If the roll spins freely by hand but not under power, the drive belt may be broken. Replacement belts cost $5–$10 and installation takes about 10 minutes with a screwdriver on most Hoover models.
Unusual odors: Old solution or dirty water left in tanks and hoses creates sour or musty smells. Run the rinse cycle with hot water and a splash of white vinegar (about 1/4 cup per gallon), then rinse again with plain water. Remove and dry all removable parts, especially the dirty water tank and filter.
Conclusion
Operating a Hoover carpet cleaner correctly isn’t complicated, but it does require attention to detail, proper solution ratios, controlled passes, and thorough post-cleaning maintenance make the difference between carpets that look refreshed for months and ones that attract dirt within days. Pre-vacuum thoroughly, extract as much moisture as possible, and don’t skip the rinse cycle on the machine itself. With these steps, most homeowners can achieve results that rival professional cleaning at a fraction of the cost.