A kitchen island transforms how a space works, more prep surface, extra storage, and a natural gathering spot all in one. Store-bought islands run anywhere from $500 to $3,000+, and they rarely fit odd dimensions or specific needs. Building your own lets you tailor every inch to your workflow, whether that’s adding a butcher block top, integrating open shelving, or tucking in a microwave. This guide walks through planning, material selection, and construction for a DIY island that looks built-in and functions like a workhorse.
Table of Contents
ToggleKey Takeaways
- DIY kitchen island plans let you customize dimensions, features, and materials for $200–$600, roughly half the cost of store-bought units that rarely fit specific kitchen layouts.
- Before starting, verify local building codes, plan electrical and plumbing requirements, and maintain minimum 36–48 inches of clearance around the island for safe traffic flow and appliance access.
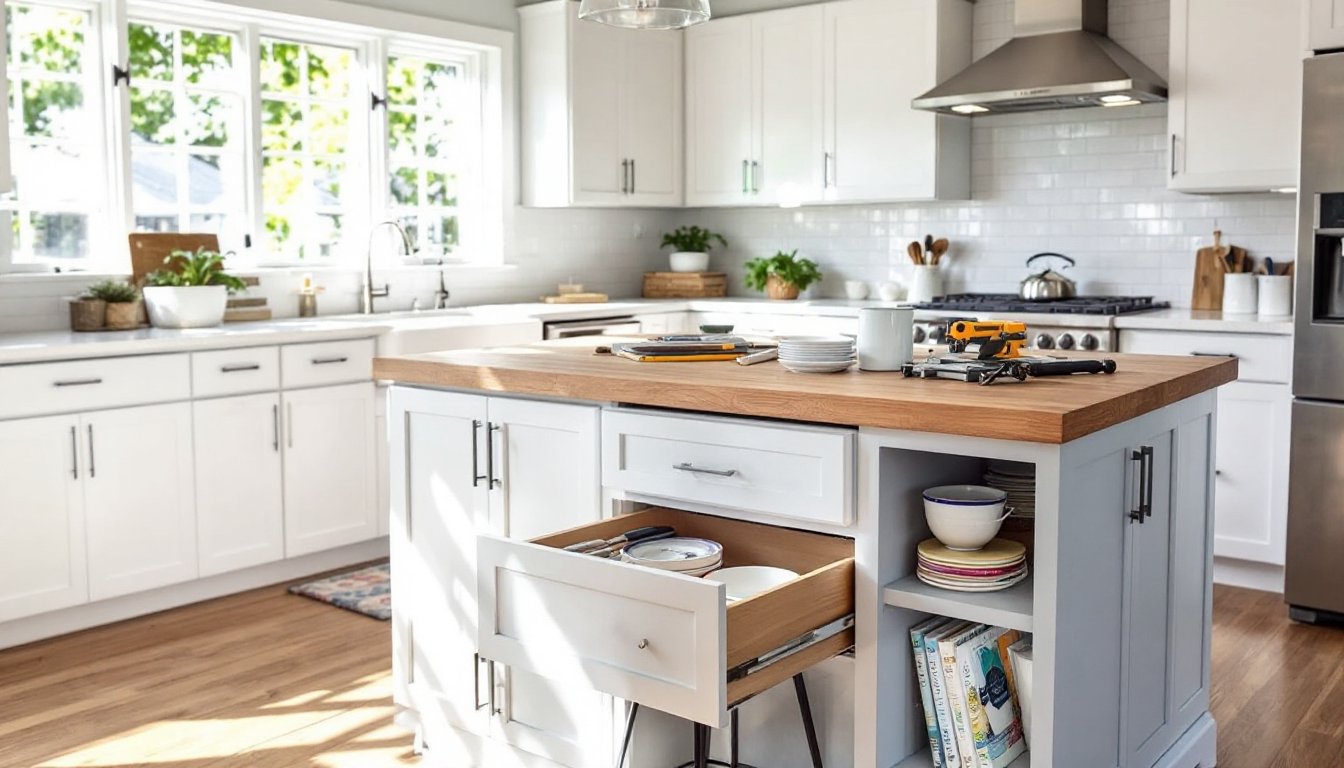
- A basic cabinet-style island uses plywood, 2×4 framing, a face frame, and pocket-hole joinery—techniques accessible to beginners with standard tools like a circular saw, drill, and miter saw.
- Countertop choice affects durability and maintenance: butcher block costs $5–$12 per square foot but requires regular oiling, laminate resists water at $15–$30, while quartz offers maximum durability starting at $60 per square foot.
- Customize your island with open shelving, integrated wine storage, pull-out trash bins, or seating overhangs, but ensure overhangs over 12 inches are supported with steel brackets or cleats to meet code requirements.
Why Build Your Own Kitchen Island?
Custom dimensions are the main driver. Off-the-shelf units come in standard widths (24″, 30″, 36″), but kitchens don’t. A DIY build fills awkward gaps, accommodates uneven walls, or extends to exact countertop heights that match existing cabinetry.
Cost control is the second benefit. A homeowner who sources their own lumber, builds a frame from 2x4s, and adds a laminate or butcher block top often spends $200–$600 depending on finish details, half the price of comparable retail units. That budget covers plywood for the cabinet box, solid wood for the face frame, and quality drawer slides.
Building also means integrating features that manufacturers skip: pull-out trash bins, appliance garages, wine racks, or a drop-down leaf for extra seating. Anyone comfortable with a circular saw, drill, and pocket-hole jig can handle a basic island in a weekend.
Essential Considerations Before You Start
Load and structural integrity matter if the island will hold heavy granite or support seated diners. A freestanding unit under 200 pounds doesn’t need special floor reinforcement, but attaching a cantilevered overhang for bar stools requires anchoring to floor joists or using steel brackets rated for the span.
Electrical and plumbing add complexity. Running a 20-amp circuit for outlets or a cooktop requires compliance with NEC Article 210 and typically a permit. If the island will house a sink or dishwasher, hire a licensed plumber for drain and supply lines, improper venting can violate code and void homeowners insurance.
Check local building codes before starting. Some jurisdictions classify a built-in island as a structural alteration requiring a permit, especially if it modifies electrical, plumbing, or floor framing. Freestanding units that don’t tie into utilities rarely need permits, but always verify.
Space Requirements and Layout Planning
The minimum clearance around an island is 36 inches on all working sides per IRC guidelines. High-traffic kitchens benefit from 42–48 inches so two people can pass comfortably or appliance doors can open without blocking walkways.
Island dimensions depend on function. A simple prep station can be as small as 24″ × 48″. Adding seating requires a 12–15 inch overhang on one side and 24 inches of width per stool. A family of four needs roughly 96 inches of linear seating if the island doubles as a breakfast bar.
Sketch a footprint on the floor with painter’s tape before cutting lumber. Walk the kitchen during meal prep to confirm traffic flow. An island that looks great on graph paper can bottleneck a busy cook zone if placed too close to the range or fridge.
Popular Kitchen Island Plan Styles
Simple cabinet-style islands use a plywood box frame with a face frame of 1×2 or 1×3 poplar, then add a countertop. This design suits beginners and costs the least. Plans from woodworking project libraries often use pocket screws and butt joints, fast, forgiving, and sturdy enough for most home kitchens.
Base-cabinet assemblies repurpose stock or unfinished cabinets from home centers. Buy two 24″ base units, secure them back-to-back, add a shared top, and finish with trim. This route saves time on joinery but locks you into standard cabinet heights (typically 34½ inches before the countertop).
Open-frame farmhouse islands pair a heavy timber base (often 4×4 posts) with lower shelves of 1×12 pine and a thick butcher block top. The open design keeps sight lines clear in small kitchens and makes a strong visual statement. Expect to invest more in hardwood and plan for mortise-and-tenon or half-lap joints if going traditional.
Rolling cart islands use locking casters rated for at least 100 pounds each. These work in rental kitchens or spaces that need flexibility. Build a lighter frame from 1x4s and ½-inch plywood to keep the unit maneuverable.
Materials and Tools You’ll Need
Materials list (for a 36″ × 48″ cabinet-style island):
- ¾-inch plywood (one 4×8 sheet for the box)
- 2×4 framing lumber (eight 8-foot studs for internal bracing)
- 1×3 poplar or pine (20 linear feet for face frame)
- Butcher block or laminate countertop (40″ × 50″ to allow overhang)
- Wood glue and 2½-inch pocket-hole screws
- 1¼-inch brad nails for face frame
- Drawer slides (full-extension, rated for 75+ pounds)
- Shims, wood filler, 120- and 220-grit sandpaper
- Primer and semi-gloss paint or pre-stain conditioner and polyurethane
Tools required:
- Circular saw or table saw for ripping plywood
- Miter saw for crosscuts and face-frame miters
- Drill/driver and pocket-hole jig (Kreg K4 or similar)
- Random-orbit sander (or sanding block for small projects)
- Level, tape measure, speed square
- Clamps (at least four 24-inch bar clamps)
- Safety gear: goggles, dust mask or respirator, ear protection, work gloves
Paint coverage averages 350–400 square feet per gallon: one quart suffices for most islands. A good bonding primer (like Zinsser Bulls Eye 1-2-3) ensures paint adheres to mixed materials, plywood edges, hardwood frames, and MDF panels.
Step-by-Step Building Process
-
Cut the plywood box parts. Rip two side panels to 34½″ × 23¼″ (height × depth) and cut the top/bottom to 46½″ × 23¼″. Account for the ¾-inch thickness of adjoining panels. A circular saw with a straightedge guide works fine: a table saw is faster.
-
Assemble the cabinet box. Apply wood glue to edges and drive 1¼-inch screws every 6 inches. Pre-drill to prevent splitting near plywood edges. Check for square by measuring diagonals, they should match within ⅛ inch.
-
Install internal bracing. Rip 2x4s to fit inside the box horizontally at the top and bottom. These support the countertop and add rigidity. Secure with 2½-inch screws through the plywood into the framing.
-
Build and attach the face frame. Cut 1x3s to form a perimeter around the front opening. Join corners with pocket screws (drill on the back side so holes don’t show). Glue and nail the frame to the plywood box with 1¼-inch brads. Flush up edges with a hand plane or sander.
-
Add back panel and shelves. Cut a ¼-inch plywood back and secure it with brads. Install adjustable shelf pins or fixed shelves using 1×2 cleats screwed to the side panels.
-
Sand and finish. Fill screw holes and seams with wood filler. Sand everything starting at 120-grit, then 220-grit. Wipe with a tack cloth. Apply primer, let dry four hours, then two coats of semi-gloss paint with light sanding between coats. For stain, use pre-stain conditioner on softwoods to avoid blotching.
-
Attach the countertop. Secure from underneath with 1¼-inch screws through corner blocks into the underside of the countertop. Don’t over-tighten, wood tops expand and contract with humidity.
-
Install hardware. Mount drawer slides per manufacturer specs (typically ½ inch down from the top edge of the drawer opening). Add pulls or knobs last to avoid paint drips.
For detailed furniture building techniques, many woodworkers start with simpler projects to practice joinery before tackling an island with drawers and doors.
Customization Ideas for Your Island
Open shelving on one end keeps cookbooks, serving platters, or a stand mixer within reach. Frame the opening with 1×4 trim and add a ½-inch plywood back painted in a contrasting color for depth.
Integrated wine storage fits in a 12-inch-wide bay. Use ¾-inch dowels spaced 4 inches apart, angled slightly upward to cradle bottles. This works best on the non-working side of the island where traffic is lighter.
Pull-out trash and recycling requires full-extension slides and a framed opening 14–16 inches wide. Buy a commercial pull-out kit (Rev-A-Shelf makes reliable units) or build a simple plywood tray on slides.
Butcher block vs. laminate vs. quartz: Butcher block costs $5–$12 per square foot (depending on species), needs monthly oiling, and can be sanded to remove stains. Laminate runs $15–$30 installed, resists water, but can’t be refinished. Quartz starts around $60 per square foot and offers the most durability, ideal if the island will see heavy knife work or hot pans.
Seating overhangs need support if they extend more than 12 inches. Use steel countertop brackets or a 2×4 cleat lagged into the cabinet frame. Code typically requires 15 inches of knee clearance and 28–30 inches from the floor to the underside of the counter for comfortable seating.
For more kitchen layout strategies and design inspiration, many homeowners sketch multiple configurations before committing to a final plan. Small changes in overhang or shelf height make a big difference in daily use.